I encourage everyone to take the time to study this page, as well as study the links provided through-out this article and website to further familiarize yourself with the SKS Carbine; more importantly, the SKS trigger group.
I encourage everyone to take the time to study this page, as well as study the
links provided through-out this article and website to further familiarize
yourself with the SKS Carbine; more importantly, the SKS trigger group.
![]()
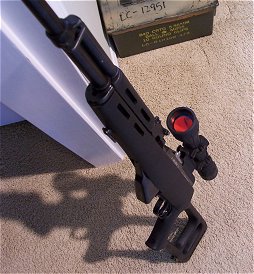
The SKS Carbine is an ever-increasingly popular firearm. Without a doubt nearly
every gun owner owns one, or has a friend who does. With the flood of
Yugoslavian SKS's on the market today, they are increasingly easier to get as
well. Almost every gun show, gun shop, or sporting goods store will have several
on display ranging from $79 for a fixer upper, to several hundred dollars for
the creme of the crop or the utmost of obscurity.
I personally spent many years hearing all my friends talk about they new SKS's
and how wonderful they are to shoot. I was finally bitten by the SKS bug in
2004, when I purchased my first (and by no means last) SKS. It didn't take long
for me to realize 4 boxes of ammo weren't going to last long...
As I am with all my investments, I take the time to research EVERYTIHNG
before I make a purchase. The same was true with the purchase of my first SKS. I
happened to find a wonderful forum called "Survivor's
SKS Boards" where I chatted with many well-informed SKS and mil-surp
enthusiasts. I now frequent the board as often as possible. I encourage everyone
who would read this page, to check out the board as well.
Through Survivor's SKS Boards, I was also introduced to another wonderful site,
SurplusRifle.com. Here you can find
tips and advice on collecting and maintaining a plethora or surplus firearms.
There are also detailed video clips and technical articles to be downloaded on a
multitude of surplus firearms.
![]()
Now that my introduction is out of the way, I would like to share some vital
information I think every SKS owner should be aware of.
Safety concerns with the SKS Carbine
| First is the possibility of a "slamfire," or worse the ignition of a round out of battery. | |
| The second being accidental discharge due to poor hammer/sear engagement. |
A "slamfire" is essentially an unintentional and uncontrollable discharge of
more than one round. It may be 2 of 3 rounds being fired instantaneously, or the
complete emptying of the magazine. It is usually caused by a seized firing
pin--due to debris, powder residue, cosmoline, or a host of other substances. It
can also be caused by using commercial ammunition with soft primers. This is
dangerous because it can happen unexpectedly and without warning. Yourself or
others could be harmed, or worse.
The SKS Carbine features a "free-Floating" firing pin which means it has no
spring to return and hold the pin rear-ward in the bolt. Since the firing pin
can freely "rattle" inside the bolt body, extra care must be taken to ensure the
firing pin channel remains clean. If the firing pin becomes stuck in a protruded
manner, and bolt is closed, the pin will strike the primer and ignite the round.
It is also possible that the first round will not be ignited until the trigger
is pulled, which will then jam the firing pin forward to the protruded postition,
triggering the involuntary ingition of some or all remaining rounds.
Since the SKS Carbine is a semi-automatic firearm, it will reload instantly
after the first round is fired. If the firing pin remains stuck in the forward
position, primers will continue to be struck involuntarily (without using the
trigger) until all remaining live rounds are fired. It is easy to see why this
is an unsafe condition.
The easiest way to remedy this problem is to assure your bolt is clean of any
and all residue. This can be done by many methods. Complete dis-assembly,
inspection, and cleaning is my preferred method.
It is my recommendation that the bolt be completely disassembled and the firing
pin channel be cleaned thoroughly (I find myself using pipe cleaners and
non-chlorinated brake cleaner). Soaking the bolt assembly is not sufficient
enough to clean out hardened, sticky cosmoline and other foreign debris. I also
discourage oiling the pin, as oils will only attract dirt and other residues
eventually seizing the pin (and that is what you're trying to avoid!!!).
For a detailed technical artical on how to dis-assemble your bolt, visit
Surplusrifle.com's article on
Bolt
Disassembly/Reassembly
A few side notes:
| Though firing pin orientation doesn't typically matter, in some Chinese variants the firing pin can be replaced upside-down in the bolt body, jamming it in the protruded postition. It might not be a bad idea to mark your firing pin's orientation with the body before your remove in from the bolt. | |
| Ben Murray makes a retro-fit kit that replaces your firing pin, with a new pin and spring. This will virtually elimitate the possibilitly of a "slamfire" all-together. For more info check out Ben Murray's website. |

This section will discuss the trigger group, with emphasis on the hammer and
sear.
There are 3 types of Hammer/Sear Engagement. They are:
| Negative Engagement - As the trigger is slowly pulled, the hammer moves forward slowly before breaking and contacting the firing pin. | |
| Neutral Engagement - As the trigger is slowly pulled, the hammer remains neutral and does not move before breaking and contacting the firing pin. | |
| Positive Engagement - As the trigger is slowly pulled, the hammer moves rearward slowly before breaking and contacting the firing pin. |
Of the three types of hammer/sear engagement, the positive type is the safest
and most desirable.
To check your SKS, pull your bolt back to cock the hammer, then remove your
receiver cover and recoil spring. Take care not to let the recoil spring shoot
across the room! You can now look down to see your hammer. Slowly squeeze the
trigger while watching the movement of the hammer. You may have to repeat
several times, as the movement can and will be minimal. (Keep your fingers
clear).
Why is hammer/sear engagement so important?
The safety mechanism on the SKS simply acts as "doorstop" to the trigger. It
does not disconnect the sear, or cease function of the hammer. Instead, it
simply keeps the trigger from moving rearword. If the rifle is cocked and
loaded, and is knocked, dropped, bumped, or the likewise the sear can still move
and the hammer can still drop. This is especially the case with a negative
hammer/sear engagement.
The best way to describe how this could happen is to use an analogy.
Let's say your car is dangling on the edge of a cliff, ready to fall hundreds of
feet to the bottom of a canyon. (This is the hammer in the cocked position.)
| If a bird lands on the hood of your car, which is over the edge of the cliff, your car will teater and fall into the canyon. (This is negative engagement as your SKS is accidently bumped) | |
| If you remain motionless in your car, as it teaters on the edge, you will most likely just remain there staring out the windsheild at your possible demise. (This is neutral engagement) | |
| If a tow-truck happens by and hooks up to the rear bumper of your car, pulling you away from the edge of the cliff, you will be saved from catastrophe. (This is positive sear engagement) |
But that doesn't make sense! How does it work?
When the hammer is in the cocked (rearward) position, it's edge is resting on
the sear. If you have a negative hammer/sear engagement, the sear actually
slopes downward toward the edge where the hammer releases. If the SKS is jarred
or bumped, the hammer can, under the tension of the hammer spring, slip down
that slope to the end of the sear and release firing the chambered round!
How do you correct this?
Positive hammer/sear engagement! If the sear slopes in the opposite direction as
it does in a negative engagement situation, if the sks is bumped or jarred the
hammer is forced away from the face of the sear and the hammer cannot possibly
be released!
My recommendation is: If you have a negative or even a neutral hammer/sear
engagement, GET IT FIXED!!!
I will cover a do-it-yourself method further down in this article.
In the mean time take extreme caution while handling. Take special care not to
bump or jar the firearm, as this could accidently set the hammer free.
Addressing the SKS Trigger
The SKS Carbine trigger, in general, is made to have a lot of trigger creep. If
your SKS is like most, there is some slack in the trigger. Once you get past the
slack, the second stage of the trigger is fairly rough and heavy. In most cases
the "creep" experienced in the second stage is quite lengthy.
What is the reason for this long pull 2-stage trigger? It is most likely a
safety concern. It is not uncommon to have new military recruits that have
little or no firearms experience. It is safer to give them a weapon with a long
trigger pull with a lot of slack over one with a "hair-trigger." There is a
lesser chance of accidental discarge by a jumpy cadet in a stressful situation.
This becomes especially critical when the user is running/jumping/diving around
in the mud, concentrating on everything else but his weapon. The extra creep
helps to assure the SKS only fires when the user means for it to fire.
The creep also acts as a cushion for poor hammer/sear engagement. In most cases
this large cushion of creep will help keep the hammer from releasing if bumped
or jarred no matter how poor your hammer/sear engagement is. I still recommend
you remedy neutral and/or negative engagement as it is still possible for the
hammer to accidently release.
My first SKS had negative hammer/sear engagement. As a test, I cocked the hammer
and bumped the unloaded firearm firmly on the ground 3-4 times. "CLICK!" the
hammer struck. The test was repeated with the same results. Imagine if the
firearm were loaded. A bump against a tree, accidently dropping it, tripping on
a root...all of these situations could be potentially lethal with the unsafe
firearm.
The SKS trigger is fairly complex in design, so If you don't feel comfortable
taking it apart or making any modifications then please don't! If you would like
to reduce the creep in your trigger, smooth out much of the roughness, lighten
your pull, and remedy your hammer/ sear engagement problems, visit
Kivaari's Little
Armory for an SKS Target/Match Safety Trigger Job. He comes highly
recommended, has a quick turn around, and will leave you in awe. You will shoot
better, and more happily!
If you would like to learn a little more about how the trigger works, and
possibly make your trigger function a little better on your own, please read on!
![]()
*NOTE: I am not a gunsmith, nor do I pretend to be one. This article merely represents my own experiences and understandings of the SKS Trigger Group. Any modification to any firearm may result in an unsafe condition. If you choose to modify your firearm you are taking inherent risks. Any injuries, damages, or the likewise will be the sole responsibilty of you, the modifier.The following is information I gathered via the internet and my own personal experiences with SKS trigger groups, and comes with no guarantee expressed or implied. If you proceed with any modification seen here, you are taking 100% liability for your actions! These steps require modifications to SKS specific parts. I recommend you make these modifications to spare parts so you do not accidently ruin your originals.
![]()
If you do not feel 100% confident with a modification you plan to attempt to
ANY firearm simply do no proceed. Firearms are not toys to tinker around
with. Your safety and the safety of others is in jeopardy when using a firearm
modified in an unsafe manner. Above all, make sure your firearm is UNLOADED
and NEVER USE LIVE AMMO to test the function of your firearm. NO
EXCEPTIONS!!!
Here is a parts reference for the SKS Trigger Group:
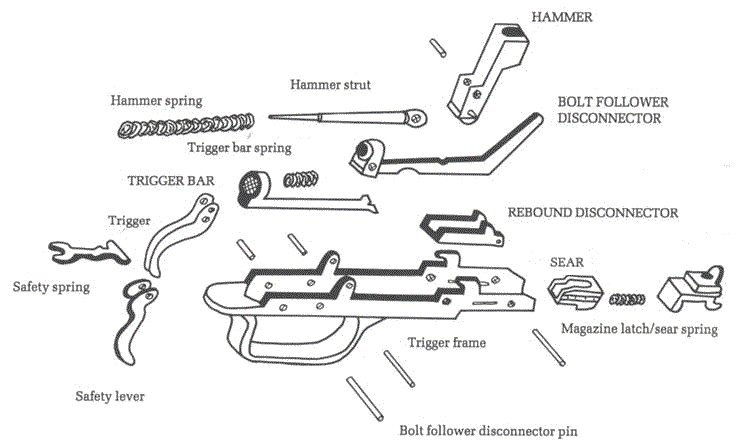
The SKS Carbine has been produced by several countries. Variations in quality
and finish of parts is somewhat apparent from country to country. One thing that
is almost universal between all SKS's is the rough and sometimes gritty feel of
the SKS trigger. Some carbines are worse than others, though almost all could
use some improvement.
One of the easiest things to modify is the replacement of the hammer and sear
springs. Wolff Gun Springs makes replacement springs in lighter weights which
will make your trigger easier to pull, and possibly feel a bit smoother.
SurplusRifle.com also has a step-by step article on how to replace these
springs.
For information, or parts, for this modification see the following links:
| Wolff Gun Springs For lighter weight Hammer & Sear Springs | |
| Lightening the SKS Trigger A great SurplusRifle.com Article |
A big problem accuracy shooters have with the SKS is the amount of creep
built in to the SKS Carbine Trigger. Though not all SKS's have such drastic
creep, most do...and all can be improved. Improvement in this area is simple, if
you take the time to understand how the SKS trigger functions.
Once again, I will send you to a website article on how to reduce your trigger's
pull. The gentleman (Fragger) who created this article is a regular on
Survivor's SKS Boards. He is very
knowledgable, and is an avid SKS owner/collector. I would also like to thank
Fragger, as the Trigger Parts Illustration seen above was borrowed from his SKS
Trigger Re-Work page. THANKS!!!
For instructions on reducing SKS Trigger Creep
| Trigger Re-Work by Fragger |
I would like to emphasize the importance of taking your time and continually
checking your work as you proceed with this modification. I recommend you make
the modifications to a spare sear in case too much metal is removed. Also, be
sure you leave SOME creep in the trigger for added safety. A hair-trigger
is not the safest condition with the SKS's Trigger design. Please don't get
over-zealous in modifying your trigger. Safety should always be your number one
concern!
As an addendum to this article, check to make sure your safety works properly.
Set your safety then attempt to pull the trigger. The trigger bar should not
contact the sear AT ALL! If the trigger bar does contact the sear, no
matter how slight, your may have rendered your safety inoperable, and you will
have to do some slight filing to the sear or trigger bar. Again, take your time
and continually check your progress.
If you plan on reducing trigger creep, polishing your sear/rails, and
installing lighter weight hammer and sear springs, you MUST also insure
you have a Positive engagement of the Hammer/Sear. As I mentioned before, the
substantial creep of the trigger acts as a safety cushion for poor hammer/sear
engagement. If you have removed the creep, you have also removed this safety
cushion, and therefore are putting yourself and others in higher risk with
accidental discharge.
This modification is sear intensive, so again I recommend you make the
modifications to a spare sear in case irreversable harm to the sear is done.
Your goal with this modification is to remove as little material as possible,
while at the same time improving hammer/sear engagement. You do NOT want
to remove much metal!
Here is a picture of an example sear after this modification.
Modifications were done with an extra fine, half round diamond file and 600 grit
wet/dry sandpaper.
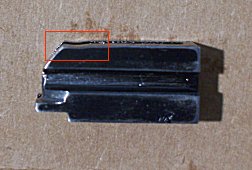
Notice the incredibly small dimple in material highlighted within the red box.
This divot, however slight, gives a positive hammer/sear engagement and will
keep the hammer from accidently releasing if bumped. When bumped, the hammer
(under tension of the hammer spring) will follow the path of least resistance or
migrate to the bottom of this dimple, away from the edge of the sear (no
accidental release!).
Please bare with me, as I will be using PaintShop "artist's renderings" of the trigger group for this section.
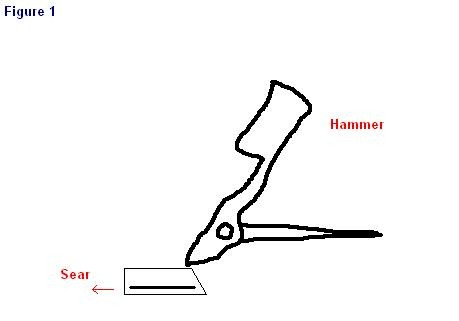
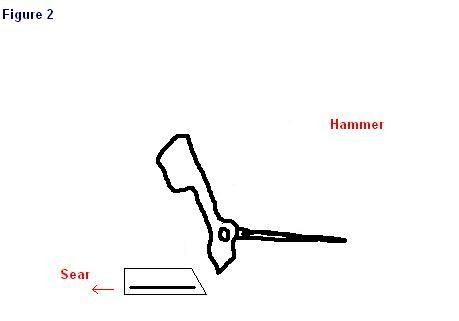
Image 1 shows the the relationship of the hammer to the sear. The lower edge of
the hammer rides on the top of the sear. As the sear is pushed forward, the
hammer gets closer to the edge of the sear. Figure 2 shows what has occured once
the sear has moved out of the way.When the hammer has reached the edge, the sear
no longer acts as a stop, and the hammer is released and flies forward.
So what does it require to create a positive hammer/sear engagement?
Think of the hammer at a teeter-totter. The top end of the hammer (that strikes
the firing pin) is one end of the teeter-totter. The lower end (where the hammer
rides on the sear) is the other end of the teeter-totter. The "pin" the hammer
rotates on is the balance point. Push up on one end, the other end goes down.
Push down on one end, the other goes up. This is the mode of thinking you must
be in at this point.
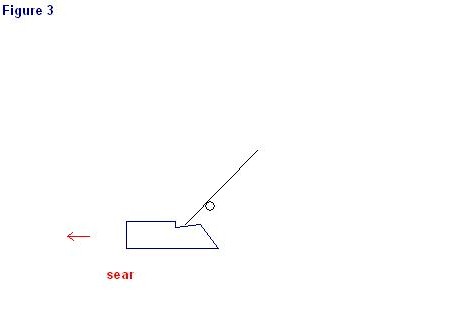
Figure 3 shows a modified sear. Notice the notch taken from the top of the sear.
The hammer has been replaced with a "teeter-totter" to help display how this
notch effects hammer/sear engagement. I'm going to ask you to use your
imagination here. Picture the sear moving forward as the arrow shows. As the
sear moves forward, the teeter-totter is forced to climb up the "ramp" created
on the top of the sear. As the lower portion of the teeter-totter is forced up
the ramp, the opposite end of the teeter-totter is going down. This is
positive hammer/sear engagement! As the sear is pushed forward, the hammer
moves rearward before breaking free! If the firearm were knocked or jarred in
this situation, the hammer (being under high spring pressure) would take the
path of least resistance. In this case, that would be down the ramp, and away
from the end of the sear! This is why positive engagement is so important. If
the firearm is knock or jarred, the hammer will not be knocked closer to the
edge of the sear, but rather away from the edge! This ensures the hammer will
not accidently release!
I will also show you an example of negative hammer/sear engagement to help you
further understand this concept.
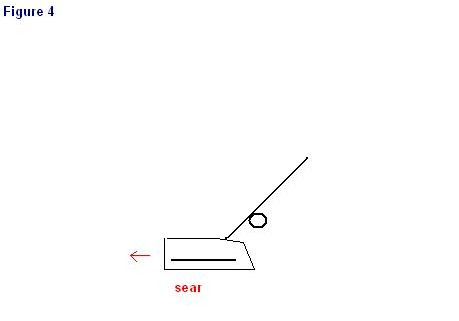
Figure 4 shows negative hammer/sear engagement. Notice that as the sear would
move forward, the lower portion of the "teeter-totter" will be moving down a
ramp on top of the sear. Moving down the ramp lowers the bottom portion of the
teeter-totter, so conversley the other end of the teeter totter is going UP.
This is what you DO NOT want! In this situation, the hammer would
creep forward as the trigger is slowly pulled. This also means that if the
hammer is cocked, and the firearm is knocked or jarred, the hammer would again
take the path of least resistance. In this case, downhill, and would creep
further toward the edge of the sear and possibly even release causing an
unwanted accidental discharge!
How do you rememdy poor hammer/sear engagement?
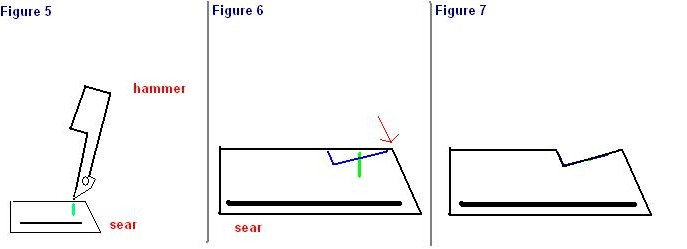
| First you need to cock the hammer and take note of where on the top of the sear the hammer naturally rests. (Figure 5) | |
| Next, you will need to remove the sear from the trigger group. | |
| Using an ULTRA FINE Jeweler's type file, create a notch on the top of the sear similar to that seem in figure 7--The notch is exaggerated--you do NOT need to remove this much material. It does not require much metal removal to reach your goal. Remember the example sear from above! A deep notch creates a heavier trigger pull due to the hammer being pulled back (against spring tension) more than necessary as the sear is released. | |
| The notch needs to start just forward of where the hammer naturally rests on the sear when cocked. (figure 6) Notice the green mark is where the hammer naturally rests, the blue portion shows where your notch should be. Take extreme caution not to remove any metal from the edge of the sear where the hammer is released (red arrow). Removing any metal here will cause adverse effects (Negative Sear Engagement!!!) As with any modifications here, remove small amounts at a time and Continually check your progress! | |
| Once the filing is complete, polish away the filing marks with fine sand paper or other methods. The smoother the top of the sear is, the smoother your trigger will feel when everything is reassembled. Again, take care not to get too close to the edge of the sear. You want the end to remain even and crisp. | |
| That's it! Take caution when re-assembling everything. Make sure you don't marr any of your freshly polished surfaces. Coat the sear grooves, sear, hammer, and frame rails with a light coat of oil or gun grease. | |
| The last thing you need to do is ensure all your hard work actually did improve your firearm. Repeatedly test by cycling your bolt and pulling the trigger. Make sure the hammer is being cocked and held securely in place by the sear. Make sure the trigger is releasing the hammer, and nothing else. Cock the hammer, and with the safety on, repeatedly (15 times) firmly place the firearm's butt on the ground. Slap it with your palm. Bump it against a wall. Drop it on the floor from a few inches. Make sure the hammer has not released...after 15 knocks/jarrs/and jolts release the safety and pull the trigger. If you her that signature click of the hammer, you did it right! Sit back, and suck down a cold one for all your efforts! Your SKS is now safer and the trigger is much more enjoyable! |
![]()
SKS page 26 for more info on the SKS Cut-Aways !!
This page is published with written permission of Bscman
YooperJ
Started in 1999
by [Yooper John's]. All rights reserved.
Revised:
04 Mar 2016 12:54:28 -0600 .
 Click
on mailbox to email
me
Click
on mailbox to email
me